
Application development and deployment have come a long way over the years. From manual processes to scripting, to full Continuous Integration and Continuous Deployment (or Delivery) processes along with pipelining tools. Using CI/CD has helped automate and streamline application development and deployment processes. It has also helped improve the general operations process. GitOps (Infrastructure updates via pull request, while using Git as the source of truth for all configurations) helps continuously manage not only the application configuration but also the business and operations configurations governing the application and the resources its using.
As an example, when deploying an application it is important to understand a “policy” that will govern the deployment.
This “policy” is made up of several different components:
-
Security parameters - (read the blogs about continuous security - Implementing a Continuous Security Model in the Public Cloud with Jenkins and Terraform!)
-
Utilization and cost - what can a typical application utilize (i.e. EC2 instance type t2.medium as the baseline), how much can a typical application utilize (i.e. no more than $X worth in a given month for all the resources consumed), and will the specific deployment exceed this parameters?
-
Performance - what is the expected performance of the application when deployed, and will it meet this performance initially and on a continuous basis?
Once these parameters (“policy”) are defined, the configuration is generally kept in Git and iterated on a regular basis based on issues and pattern matching pre and post deployment. Git will allow you to track these configurations properly and even potentially roll back to a known “working” policy.
This “policy” as we have described becomes increasing important when using AWS/Azure/GCP or other hyper scalers. Cost, utilization, security, performance can become “run away” problems. Preventing and containing these issues is important.
In this blog we will explore how to manage the utilization and cost parameters for an application prior to deployment using a popular CI/CD tool (Gitlab) along with other tools (like CloudHealth by VMware) to manage a cohesive and manageable process for utilization and cost in a deployment.
Utilization and Cost Policy
What is a utilization and cost policy for the public cloud? In particular the biggest hyperscaler, AWS.
There are several different parameters that need to be considered and thought through:
First you want to understand the pre-conditions that will help set up the “pre-deployment policy”:
1. Do you understand your existing utilization and spend with respect to overages, wasted resources, etc. This baseline is important in setting up the required policy for managing the utilization and cost for the application. CloudHealth by VMware enables you to gain extensive insight into how efficient teams, projects, applications etc are in AWS/Azure/GCP.
2. What is your budget? In particular, how much are you allowed to spend on the total resources across the board and how much do you think each project will be able to spend in total on AWS/Azure/GCP. CloudHealth can help us compare budget vs actual spend, but we’ll be using logic within the pipeline for this example.
3. Based on historical and the budget, what are the resources that should or shouldn’t be used
4. You also want to set up some categories or “buckets” enabling you to simply manage a predefined set of configurations. i.e. a standard configuration for dev, prod, etc. These will need to be setup with specific resources, capacities, etc (as noted in the previous bullet).
These conditions are generally set up in the infrastructure deployment as part of the application deployment. Its generally managed with specific templates/scripts with terraform, cloudformation templates, and/or ansible accessing AWS/Azure/GCP CLI.
These templates/scripts (i.e. Terraform) will be kept in Git and managed/tweaked on a regular basis as you are continuously understanding your utilization and spend through tools like CloudHealth by VMware.
A second set of scripts will be kept for the application deployment it self.
Hence there are generally two sets of pipelines used -Infrastructure pipeline - setting up and deploying the Infrastructure on AWS/Azure/GCP. -Application pipeline - setting up and deploying the application on the infrastructure in the previous pipeline.
There is a great article on AWS blog about “blue”/“green” deployments using this dual pipeline structure. https://aws.amazon.com/blogs/devops/bluegreen-infrastructure-application-deployment-blog/
Second you want to setup a continuing check “post deployment”.
All of this is easily achieved using CloudHealth by VMware and the use of Perspectives and Policies based on these Perspectives. (see blogs - https://www.cloudjourney.io/articles/publiccloud/optimizing_ebs_pb/ or https://www.cloudjourney.io/articles/multicloudops/ch-zombie-pb/)
In this blog we will focus on how to implement the pre-deployment policy with a CI/CD pipeline using Gitlab and CloudHealth by VMware.
The Overall Process and Flow
 Before we walk through the configuration its best to understand what we will show. For the purposes of this demonstration, we’re going to be using the following
tools:
Before we walk through the configuration its best to understand what we will show. For the purposes of this demonstration, we’re going to be using the following
tools:
-
Source Repository & CI/CD Pipeline: GitLab
-
Budget information to query: CloudHealth
-
Deployment Location: GKE
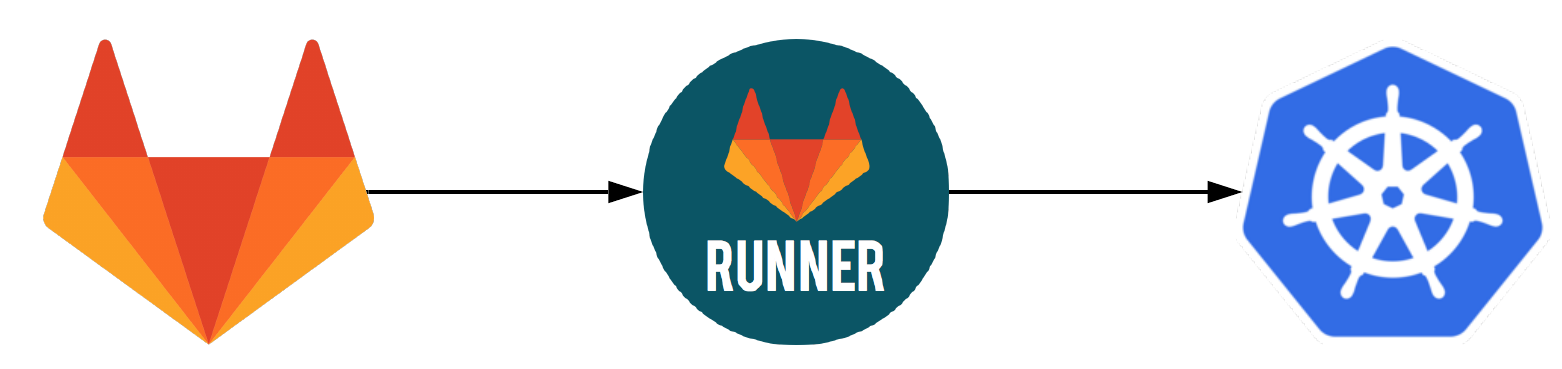
When you use GKE with GitLab, you can very easily create a GKE cluster and prep / configure it directly from GitLab and it ties in with the Repo and Pipeline automatically. For this reason, we’re going to skip the infrastructure setup for this.
In the situation we show, we’ve been running a the following:
1. A set of clusters is running on GKE for a specific project and all the resources for that project are under one account.
2. Only one google account (for our specific project) is loaded into CloudHealth by VMware to keep things simple.
3. Based on prior history of the team/project we determined that they would be best served by only using no more than $500 in total, since its a dev environment and the team is very efficient.
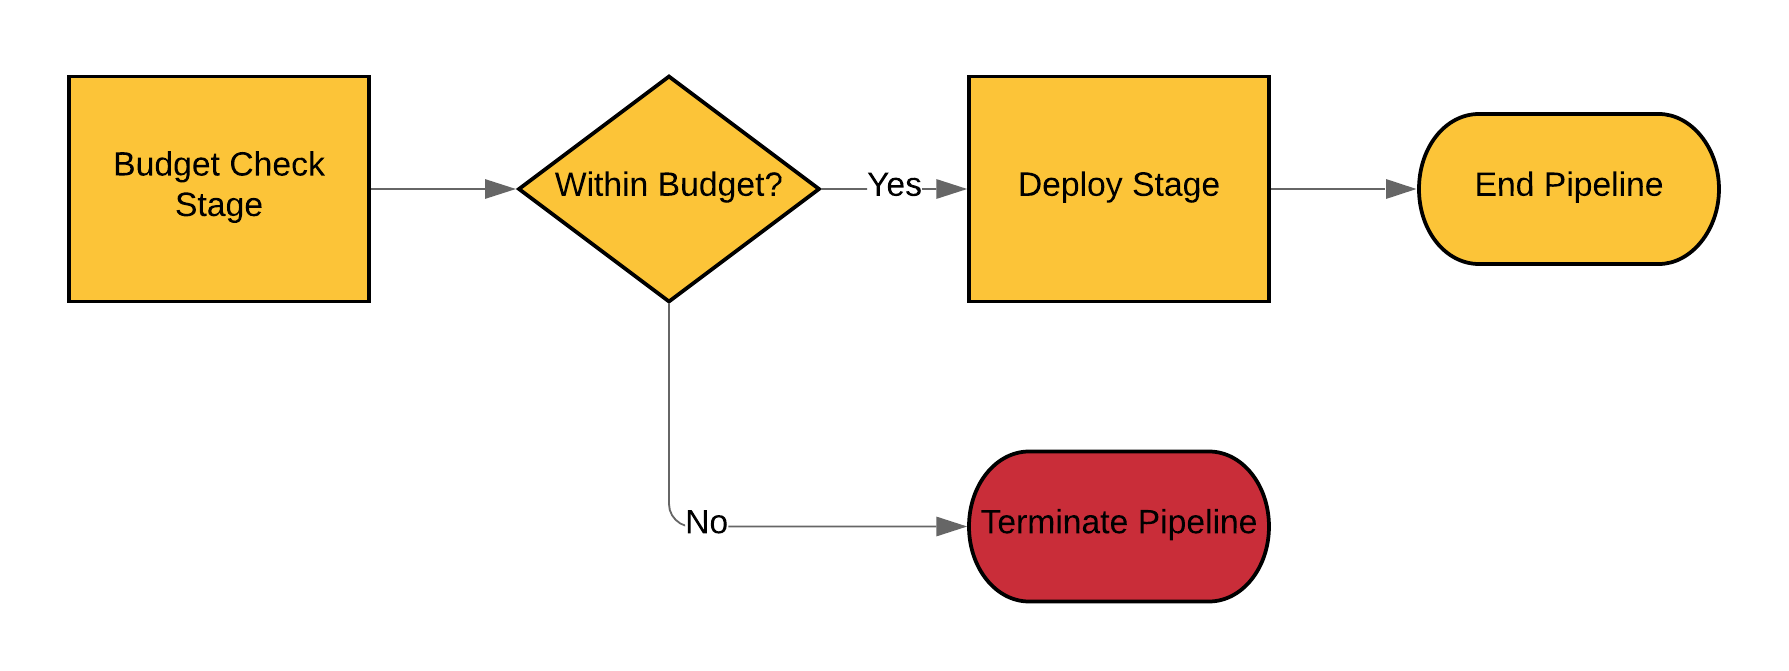
The over all flow we execute below is as follows:
1. Use a basic application to demonstrate the project. We will be using the Kubernetes Guestbook application.
2. A predefined cluster is setup in GKE with other components being deployed in it.
3. A specific user Tim is deploying his parts of the application into the GKE cluster along with others.
4. Prior to Tim deploying his code into the cluster we check to see if the cluster (or the TOTAL GCP spend is > $500).
For this example we’re making a very simple Rest API call into CloudHealth from within the GitLab Pipeline. This will decide whether we proceed or not. The process flow looks like this:
The Pipeline
Overall Configuration
Let’s take a look at the Pipeline Configuration:
test:
  stage: test
  image: vtimd/alpine-python-kubectl
  script:
    - chmod +x gitlab-budget-test_py.py
    - ./gitlab-budget-test_py.py
  after_script:
    - if [ -f "overbudget.txt" ]; then exit 33 && echo "overbudget"; else echo "Within Budget. Continuing!"; fi
deploy:
  stage: deploy
  image: vtimd/alpine-python-kubectl
  script:
    - kubectl apply -f redis-master-deployment.yaml
    - kubectl apply -f redis-master-service.yaml
    - kubectl apply -f redis-slave-deployment.yaml
    - kubectl apply -f redis-slave-service.yaml
    - kubectl apply -f frontend-deployment.yaml
    - kubectl apply -f frontend-service.yaml
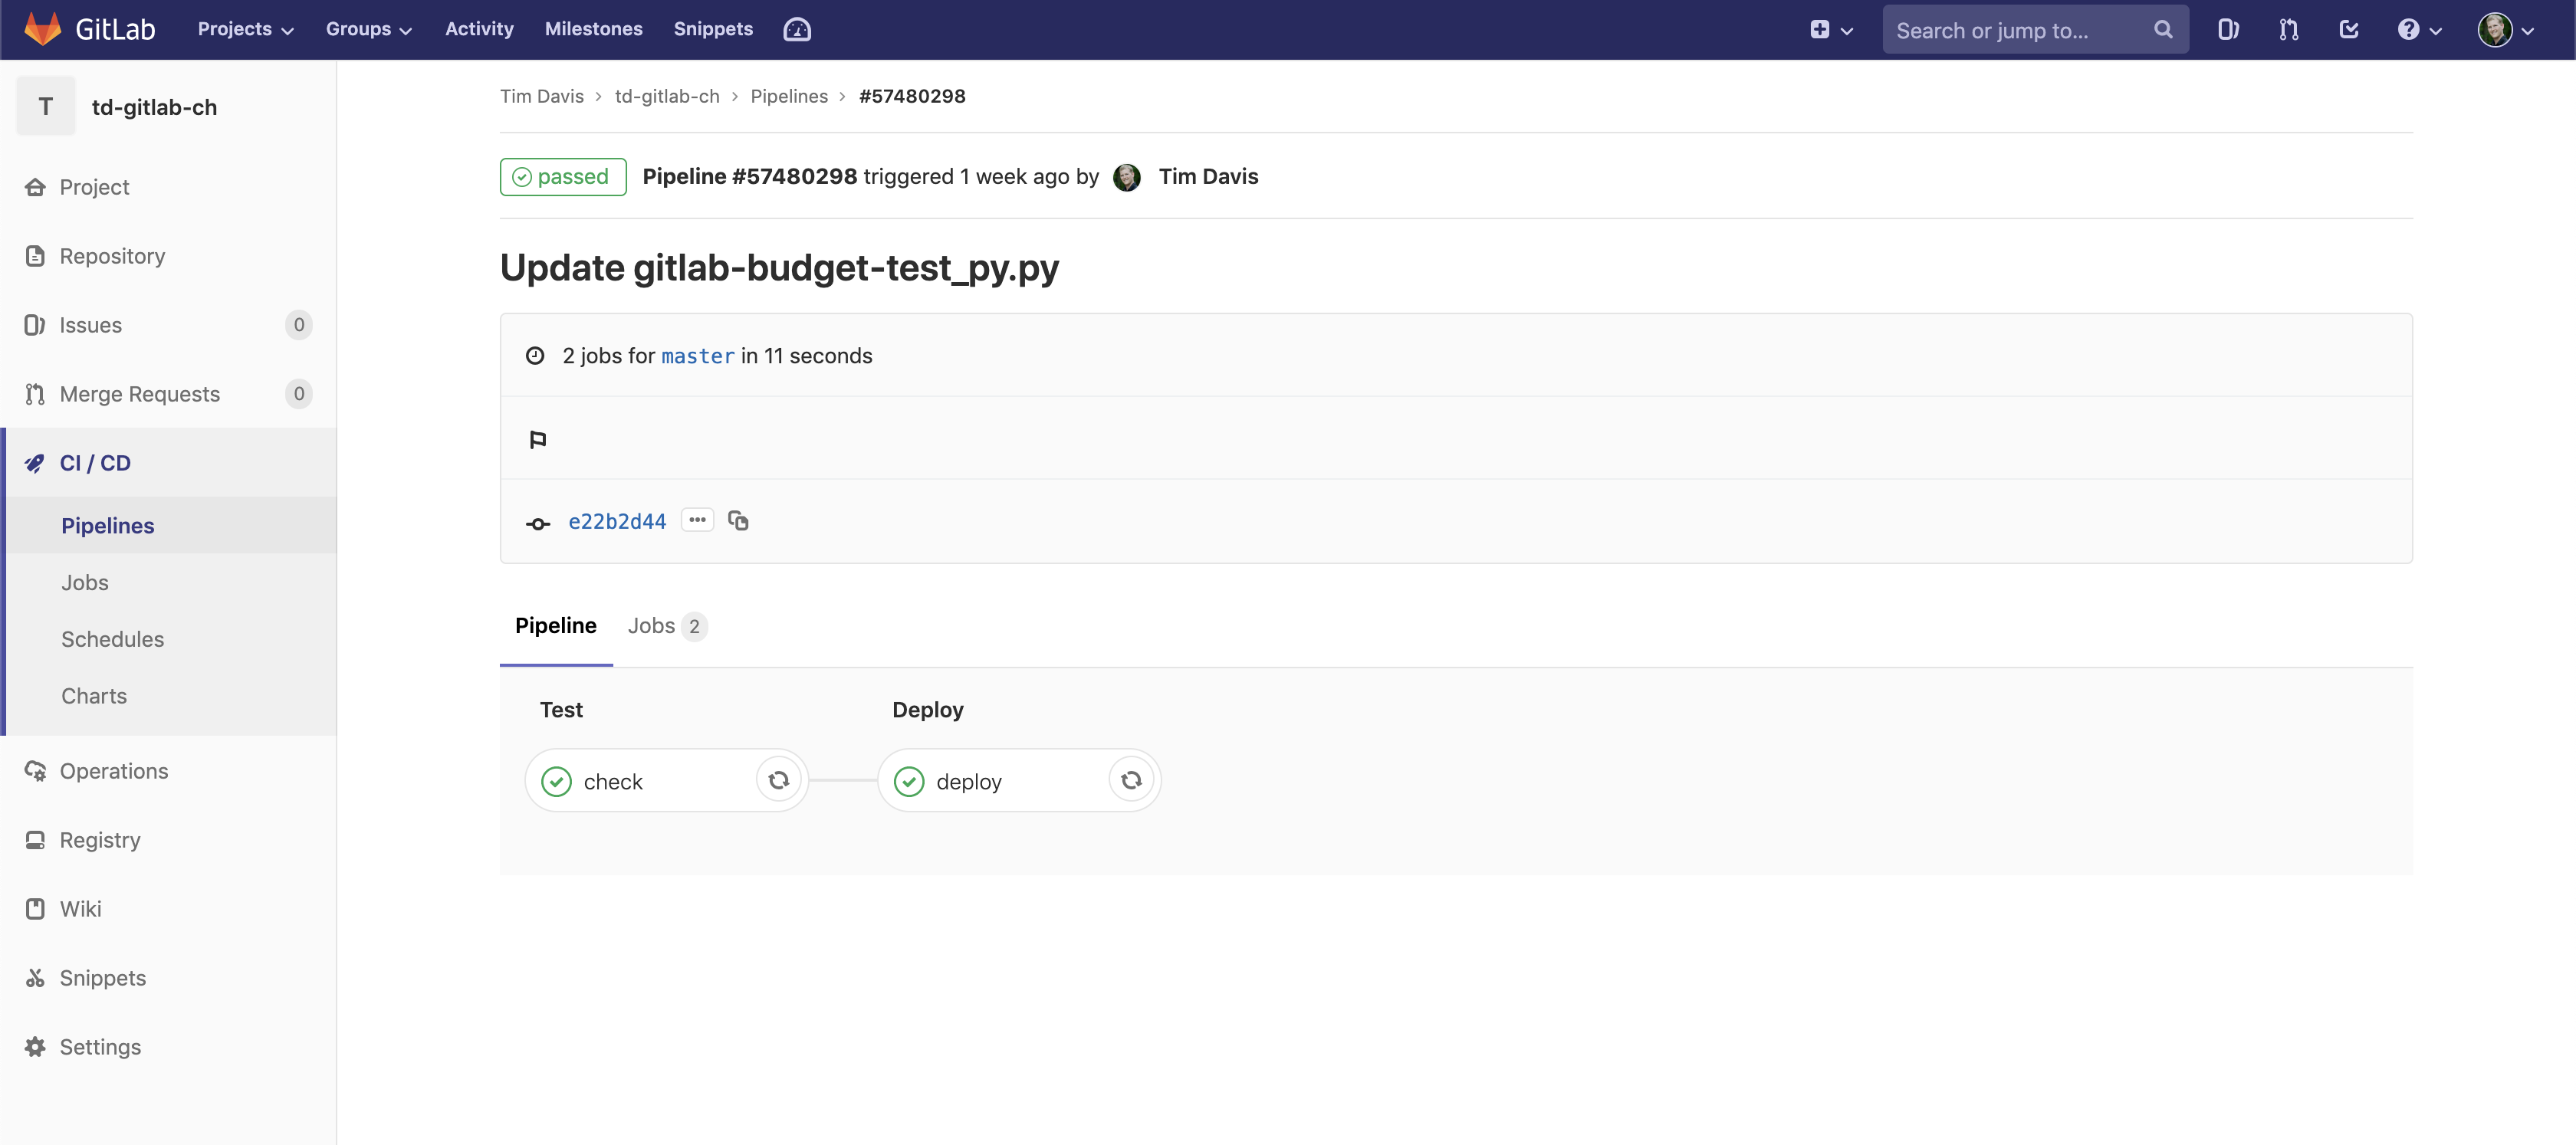
You’ll see in the YAML file that this is a very simple 2-stage pipeline. The first stage runs runs the budget check, the second runs the deployment.
Container for Runner
We needed a container for the GitLab Runner to execute within. The GitLab Runner is the service that executes the CI/CD jobs, and sends the info to / from the pipeline. I created a custom container for this project:
FROM alpine:latest

RUN apk update
RUN apk add curl

RUN curl -LO https://storage.googleapis.com/kubernetes-release/release/$(curl -s https://storage.googleapis.com/kubernetes-release/release/stable.txt)/bin/linux/amd64/kubectl
RUN chmod u+x kubectl && mv kubectl /bin/kubectl

# Install Python Stuff
RUN apk update && \
    apk add python3 && \
    apk add python3-dev && \
    apk add py-pip && \
    python3 -m ensurepip && \
    rm -r /usr/lib/python*/ensurepip && \
    pip3 install --upgrade pip setuptools && \
    if [ ! -e /usr/bin/pip ]; then ln -s pip3 /usr/bin/pip ; fi && \
    if [[ ! -e /usr/bin/python ]]; then ln -sf /usr/bin/python3 /usr/bin/python; fi && \
    apk add py-requests && \
    rm -rf /var/cache/* \
    rm -rf /root/.cache/*

ENTRYPOINT []
CMD []
As you can see, it is based on Alpine. This is a very lightweight linux distro. From there, we simply add the kubectl stuff, and we’re good to go. This is a publicly available container on docker hub, so feel free to use it as you see fit. The GitHub repo for the container can be found here.
Python Script and Pipeline Failure Logic
This is where the secret sauce comes in. And really, it wasn’t that difficult once I figured out how the GitLab CI system works.
First things first. The Python script. This is the mechanism we’re using to actually make the API call out to CloudHealth. We are simply querying for the total cost of all GCP usage on our account. It then takes the result and checks it against a hard-coded budgetary number. If it is over budget, it creates a file called overbudget.txt and inputs the amount over budget. Else, the file is not created. This is the mechanism that our logic works against. Here is the python script:
#!/usr/bin/python

import json
import pickle
import os
import sys
import datetime
import string
import subprocess
import requests


#Logging initialization.
import logging
from logging.config import dictConfig
from logging.handlers import SysLogHandler

DEFAULT_LOGGING = {
    'version': 1,
    'disable_existing_loggers': False,
    'loggers': {
        '': {
            'level': 'INFO',
        },
        'another.module': {
            'level': 'DEBUG',
        },
    }
}

logging.config.dictConfig(DEFAULT_LOGGING)

api_url_base="https://chapi.cloudhealthtech.com/olap_reports/gcp_cost/history?api_key=INSERT-YOUR-API-KEY"
headers={'Content-Type': 'application/json'}

def getGCPCost():

    payload={'interval':'monthly'}

    response=requests.get(api_url_base, headers=headers) #add params=payload for other parameters

    if response.status_code == 200:
        output = json.loads(response.content.decode('utf-8'))
        f=open('rawoutput.txt', "w+")
        f.write(json.dumps(output, indent=5, sort_keys=True))
        f.close()
    else:
        return 0

    return output

def checkCost(output, budget):

    if float(output["data"][0][0][0]) > budget:
        amountOver=(float(output["data"][0][0][0])-budget)
        return amountOver
    else:
        return -1

def dumpinFile(overBudget):

    f=open('overbudget.txt', "w+")
    f.write(str(overBudget))
    f.close()


if __name__ == '__main__':

    budget=500
#    logging.info("in main")
    output=getGCPCost()
    if output != 0:
        overBudget=checkCost(output, budget)
        if overBudget > 0:
            dumpinFile(overBudget)
        else:
            print("notOverbudget")
    else:
        print("found issue")
You can see near the bottom the ‘budget=500’ line. This is where the budget number is hard-coded. This could also be passed to the container environment as an environment variable from the pipeline configuration, if you wanted to go that route.
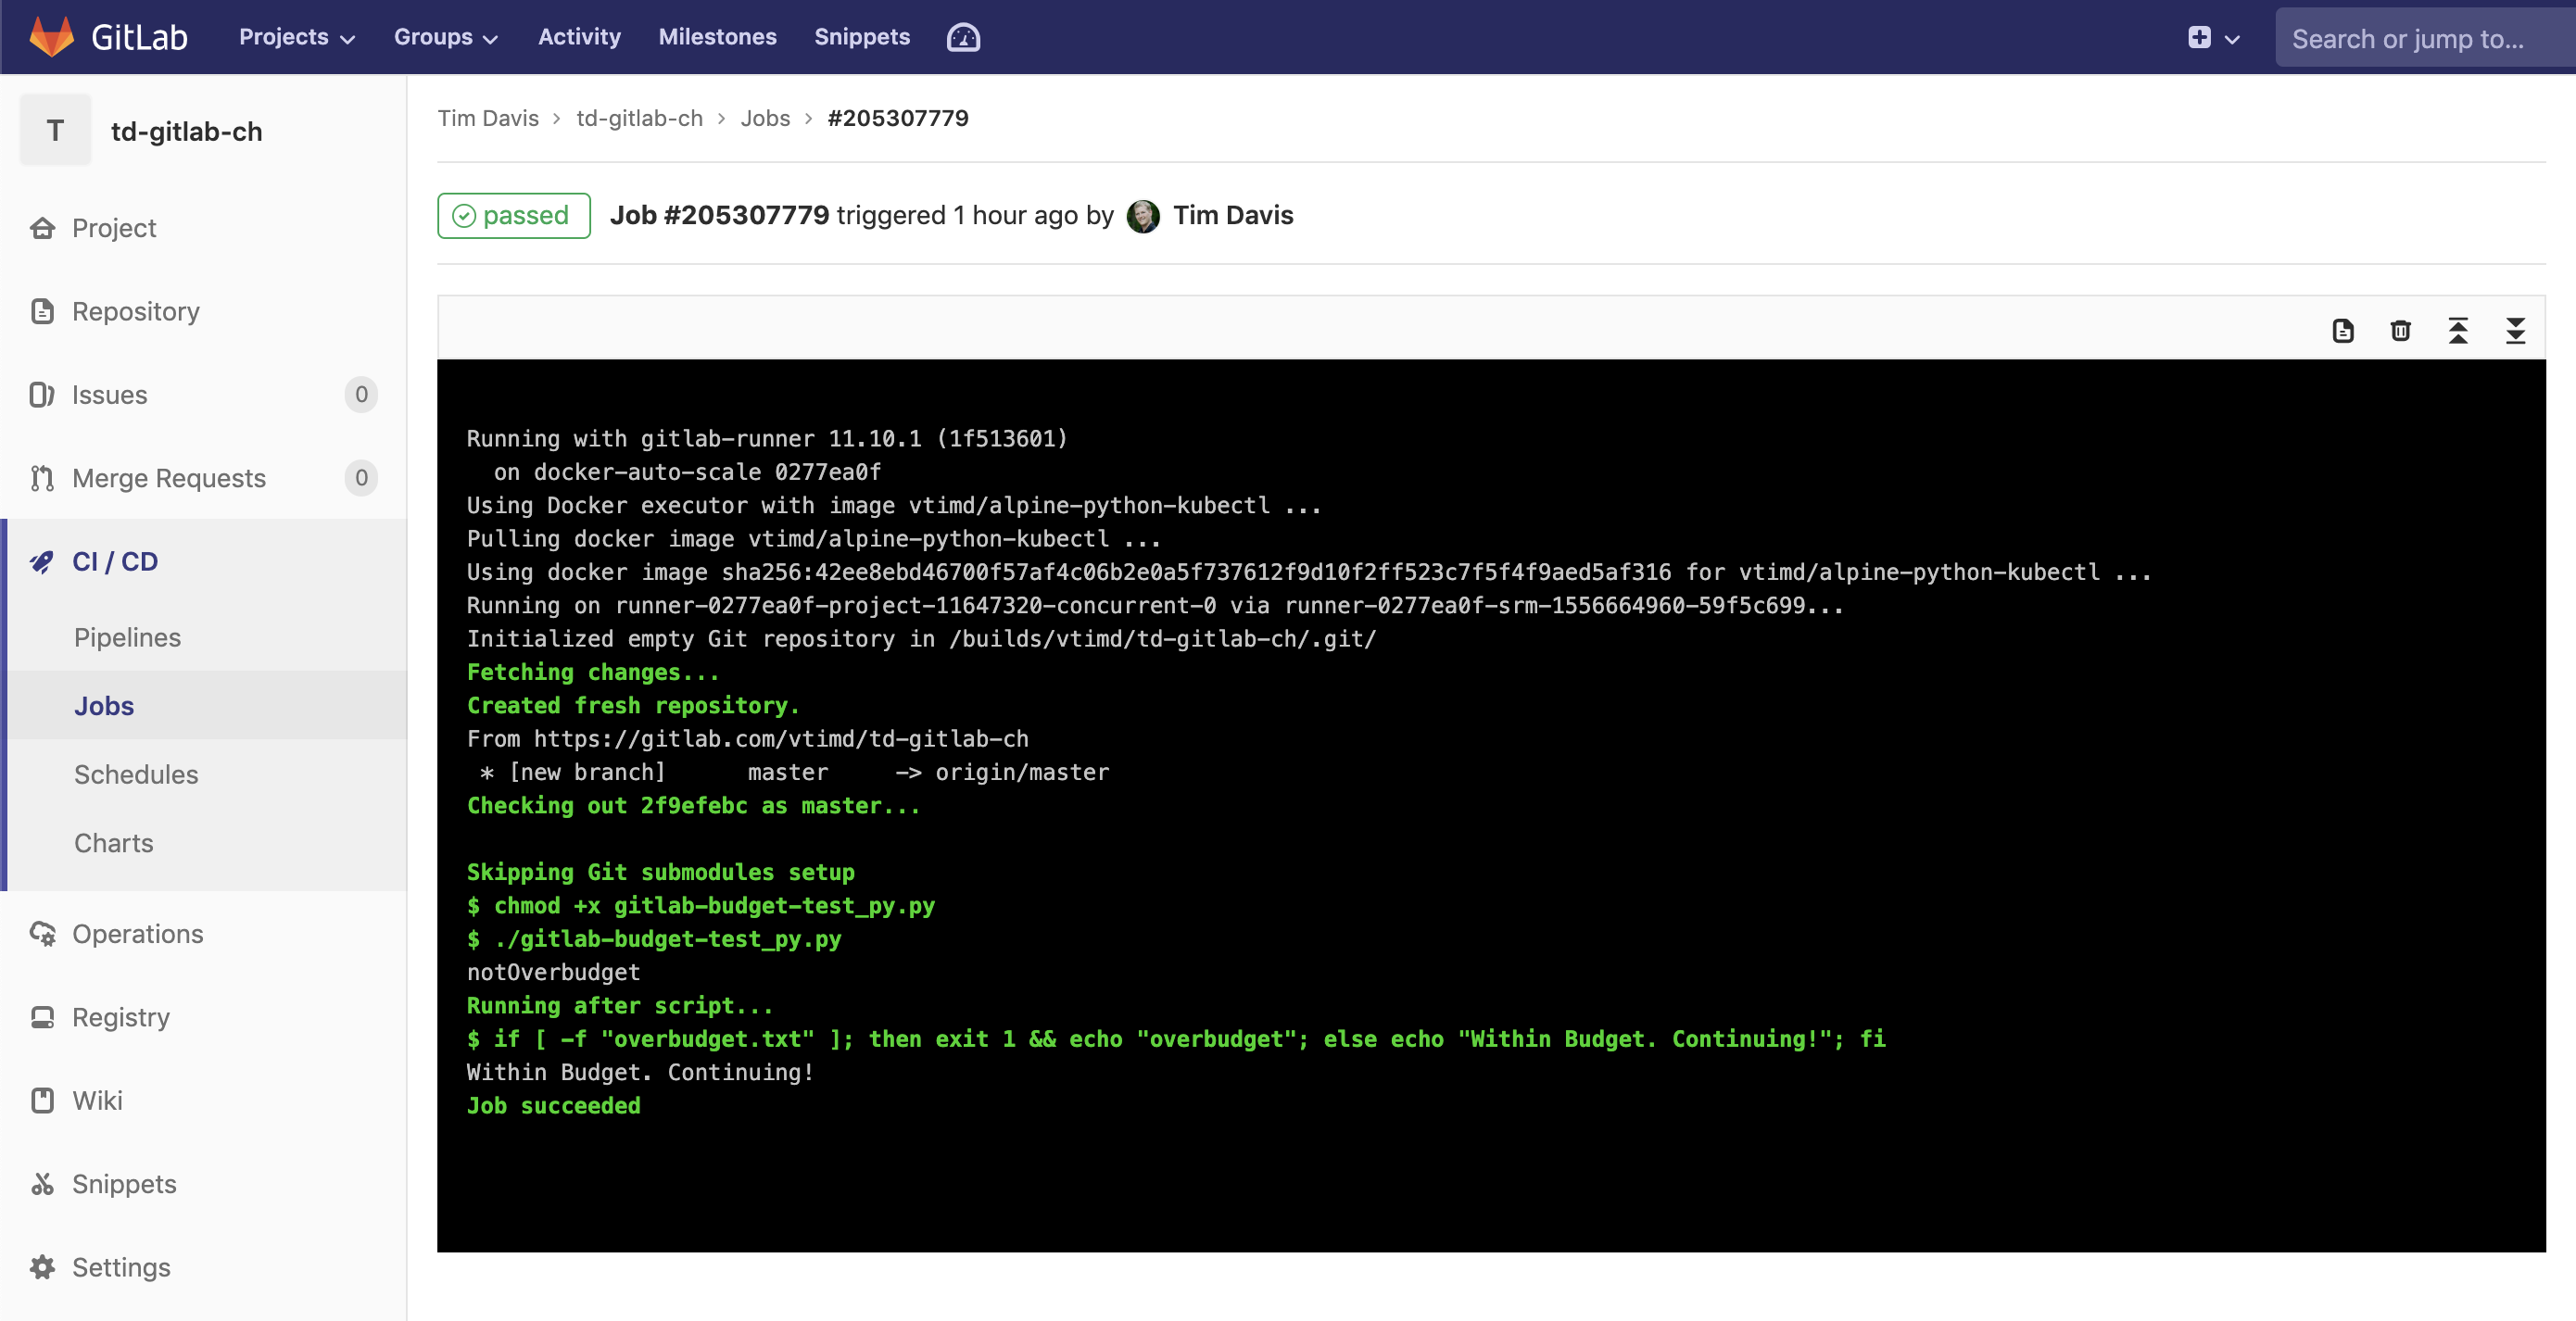
The next part is just a simple bash if, else, fi command put into the “after_script” section in the GitLab CI. Keep in mind this script is being run by the runner, in the container we setup for the CI/CD process.
  after_script:
    - if [ -f "overbudget.txt" ]; then exit 33 && echo "overbudget"; else echo "Within Budget. Continuing!"; fi
This logic simply says, “If overbudget.txt exists, then exit the pipeline with code 33. Also, echo overbudget into the console. Else, echo Within Budget. Continuing! and proceed.”
Pipeline Execution
Our pipeline is triggered automatically by the commit of any file in the pipeline. GitLab does all this trigger configuration work for you, then configures the stage and task info based on whatever you put in the CI config YAML. It is extremely user-friendly, for configuration.
So let’s pretend we just made a commit to our repo. The pipeline will automatically start executing with the Test stage:
One of the coolest things is how easy the GitLab runner makes things. It automatically clones the Git repo into the container for jobs. It makes pipeline configuration much more simple than a Jenkins, or Spinnaker.
Our runner clones the repo in, which includes our Python script. We mark it executable, then run it. Once that is done our “after_script” is run in the bash shell which does the if, else, fi checking for that txt file. Since it doesn’t exist, we’re good to go on to the Deploy stage:
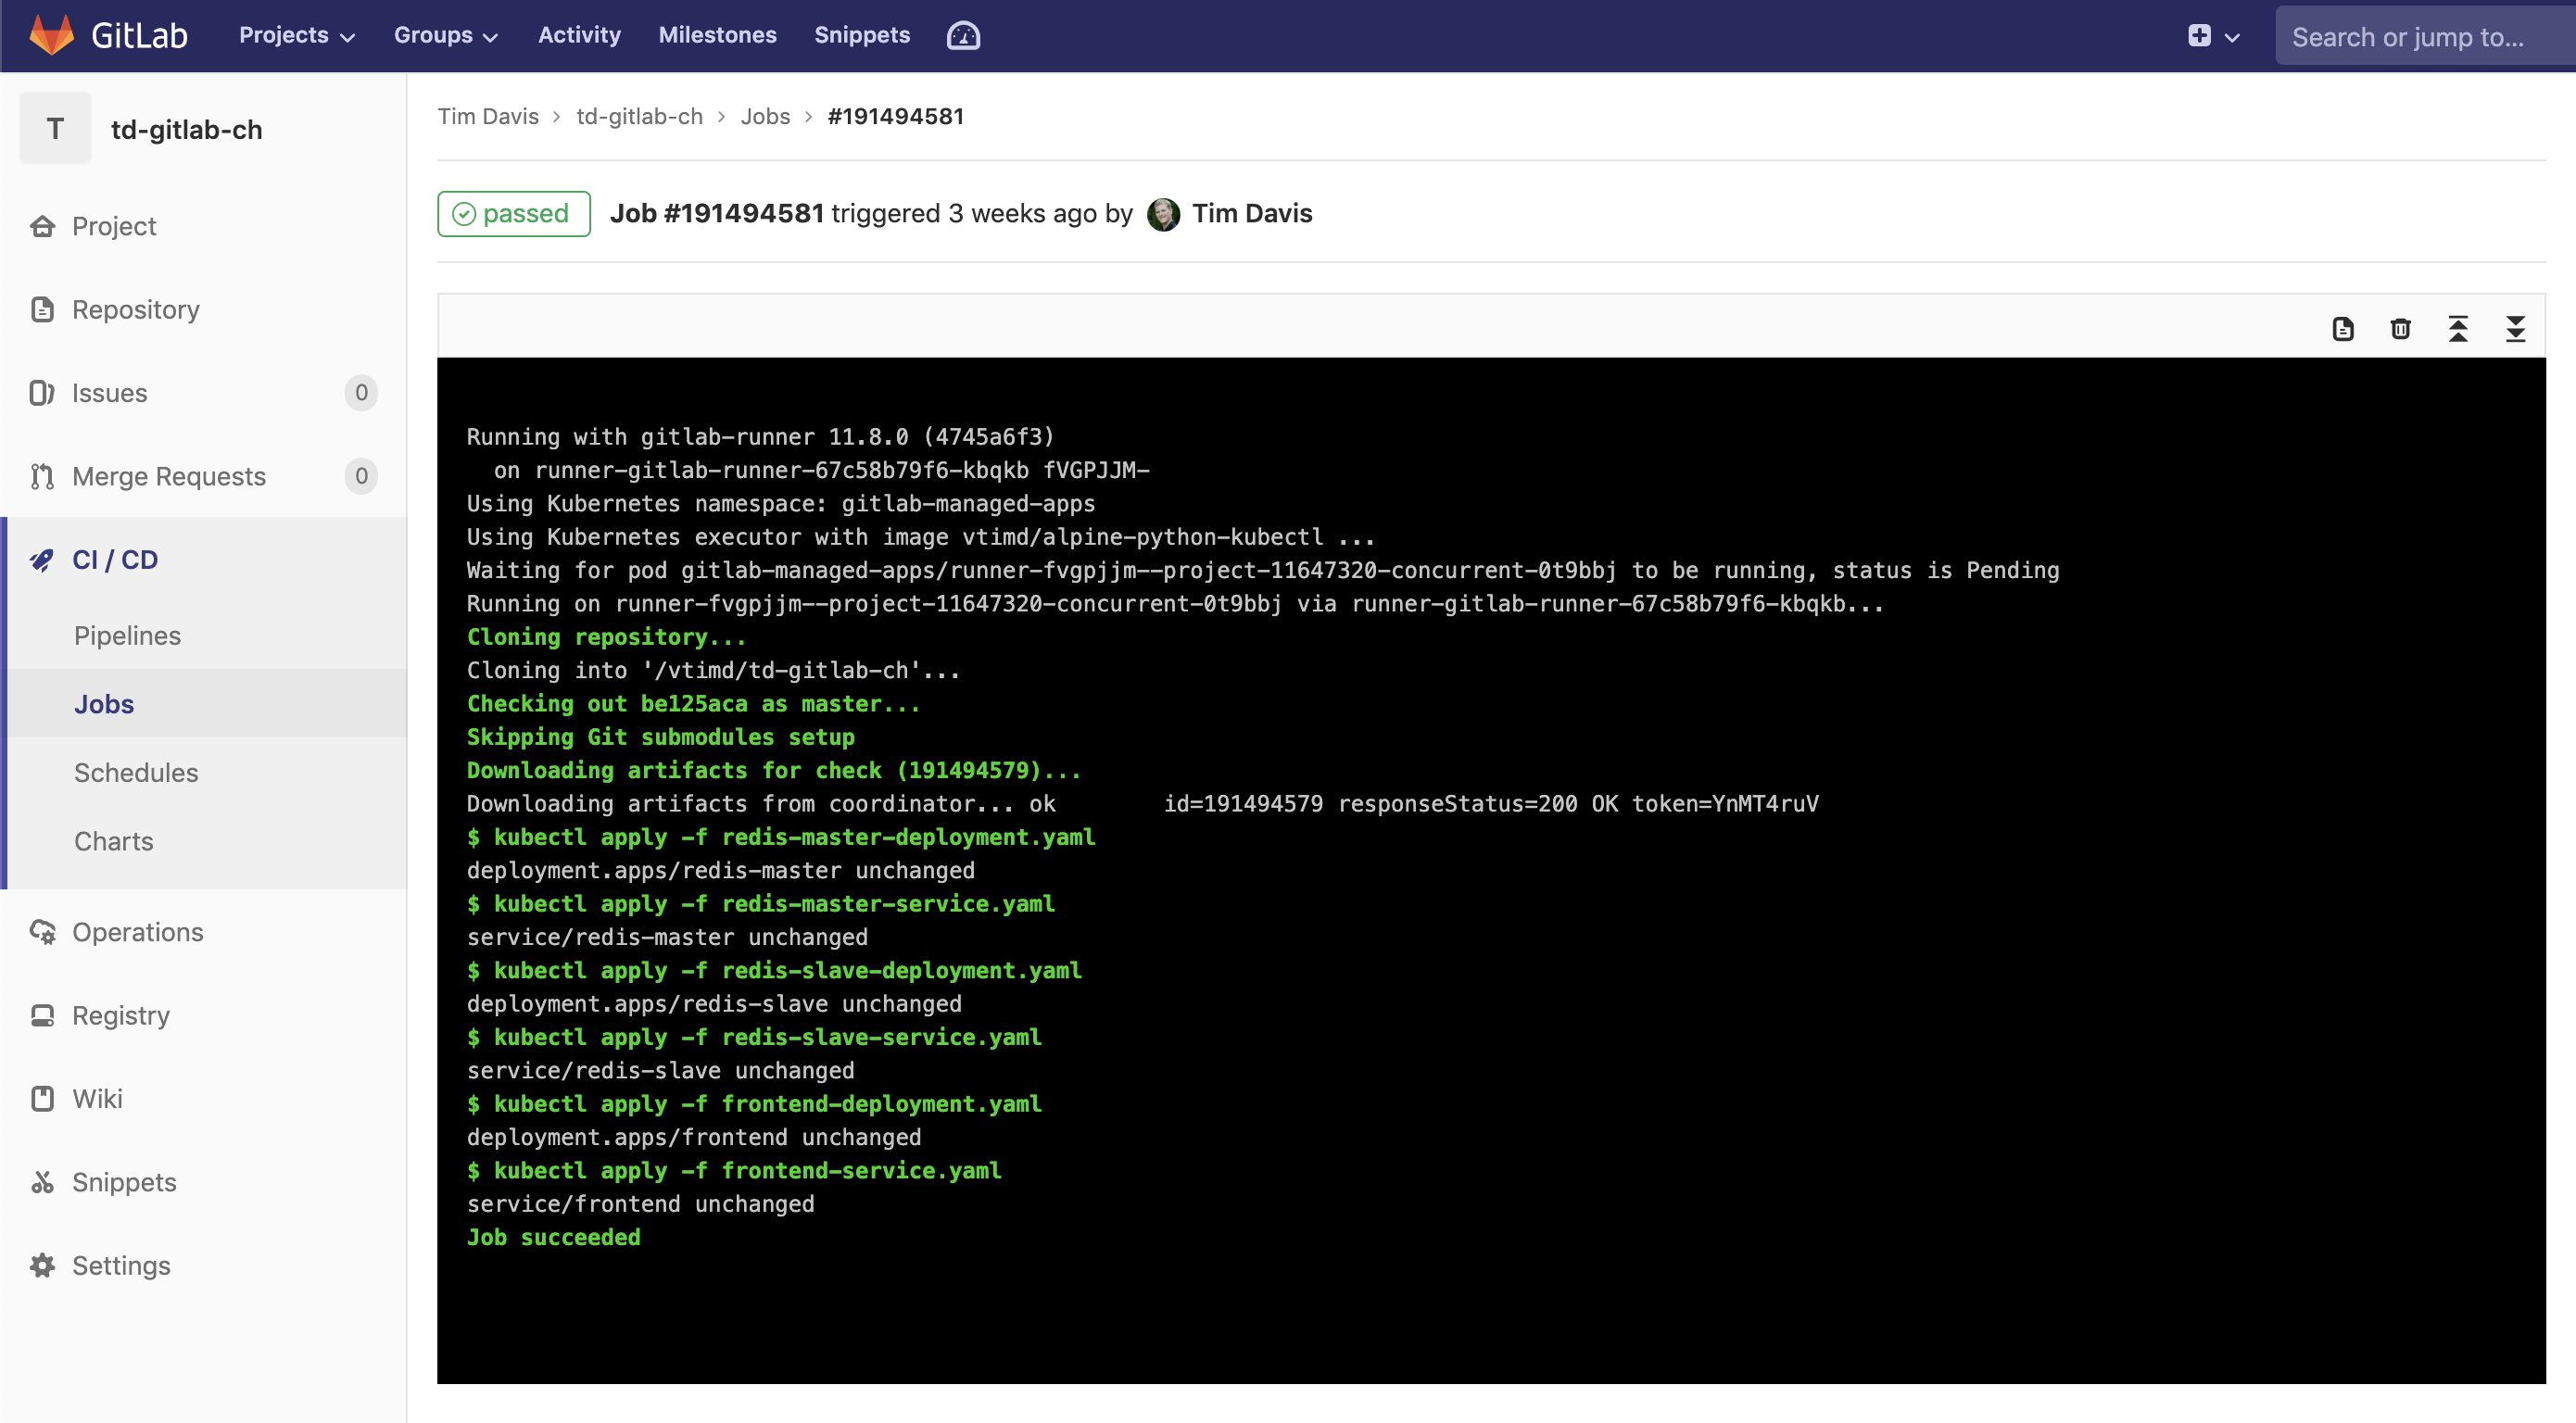
The Deploy stage is simply using kubectl commands run from bash inside the container to apply a series of YAML files to the pre-configured cluster. As you may have noticed in the pipeline config that we didn’t have to configure a Kubernetes endpoint. This is because of how easy GitLab makes connecting clusters. You can even create GKE clusters directly from within the UI of GitLab to use with your repositories. It could not be easier.
Conclusion
So as you can see, we were able to solve a pretty common problem with a little API call via Python, and a bit of bash scripting. We have solved the budget problem by bringing check into the CI/CD process. With CloudHealth by VMware, you can track the cost and performance of your applications easily through reports, policies and perspectives.
If you have any questions regarding this or any other issue, feel free to reach out to us @ApperatiIO on Twitter!